The lockdown DIY bug has bitten the best of us over this past year.
Regardless of whether home improvements were on your mind prior to last March or not, there’s just been something about having to stay inside our own four walls, accompanied by having more time on our hands than ever before, that seems to have turned the nation into DIY fanatics.
Who would’ve thought?
And with social media platforms flooded with people showing off everything from just a simple lick of paint or change of wallpaper, to their ingenious furniture upcycling creations, their at-home bars built out of pallets, and even their more ambitious garden pub makeovers, we’ve really seen it all too.
Now though, there’s a new DIY trend that’s undeniably taking over England’s third national lockdown, and people all across the country are having a crack at it.
ADVERTISEMENT
It’s something that fills the Pinterest boards and Instagram feeds of interior design lovers, something that the ever-popular Facebook group DIY On A Budget Official – which currently has over 2.1 million active members – sees numerous posts about on the daily, and even something which saw a search increase of over 250%, according to data from Google Trends.
So, we really weren’t kidding when we said it was taking over.
ADVERTISEMENT
But, what is this trend then?
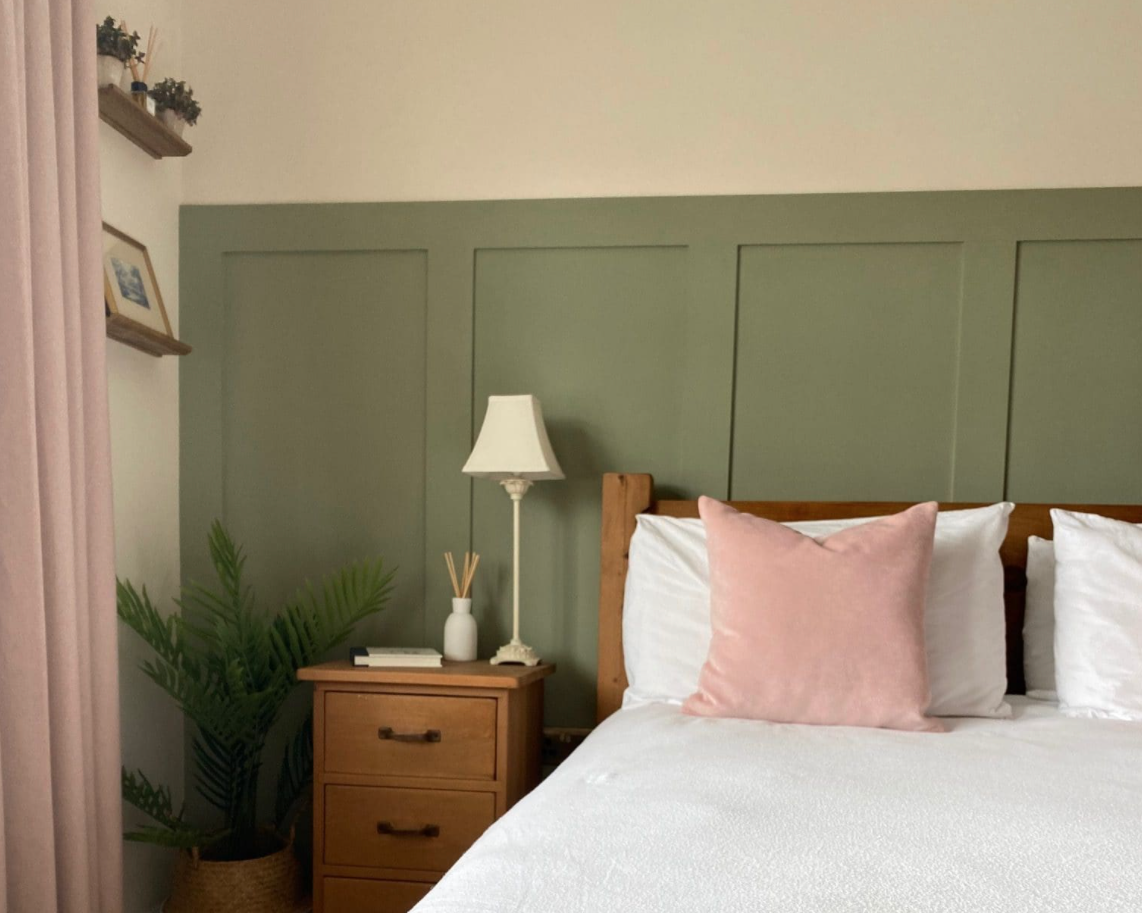
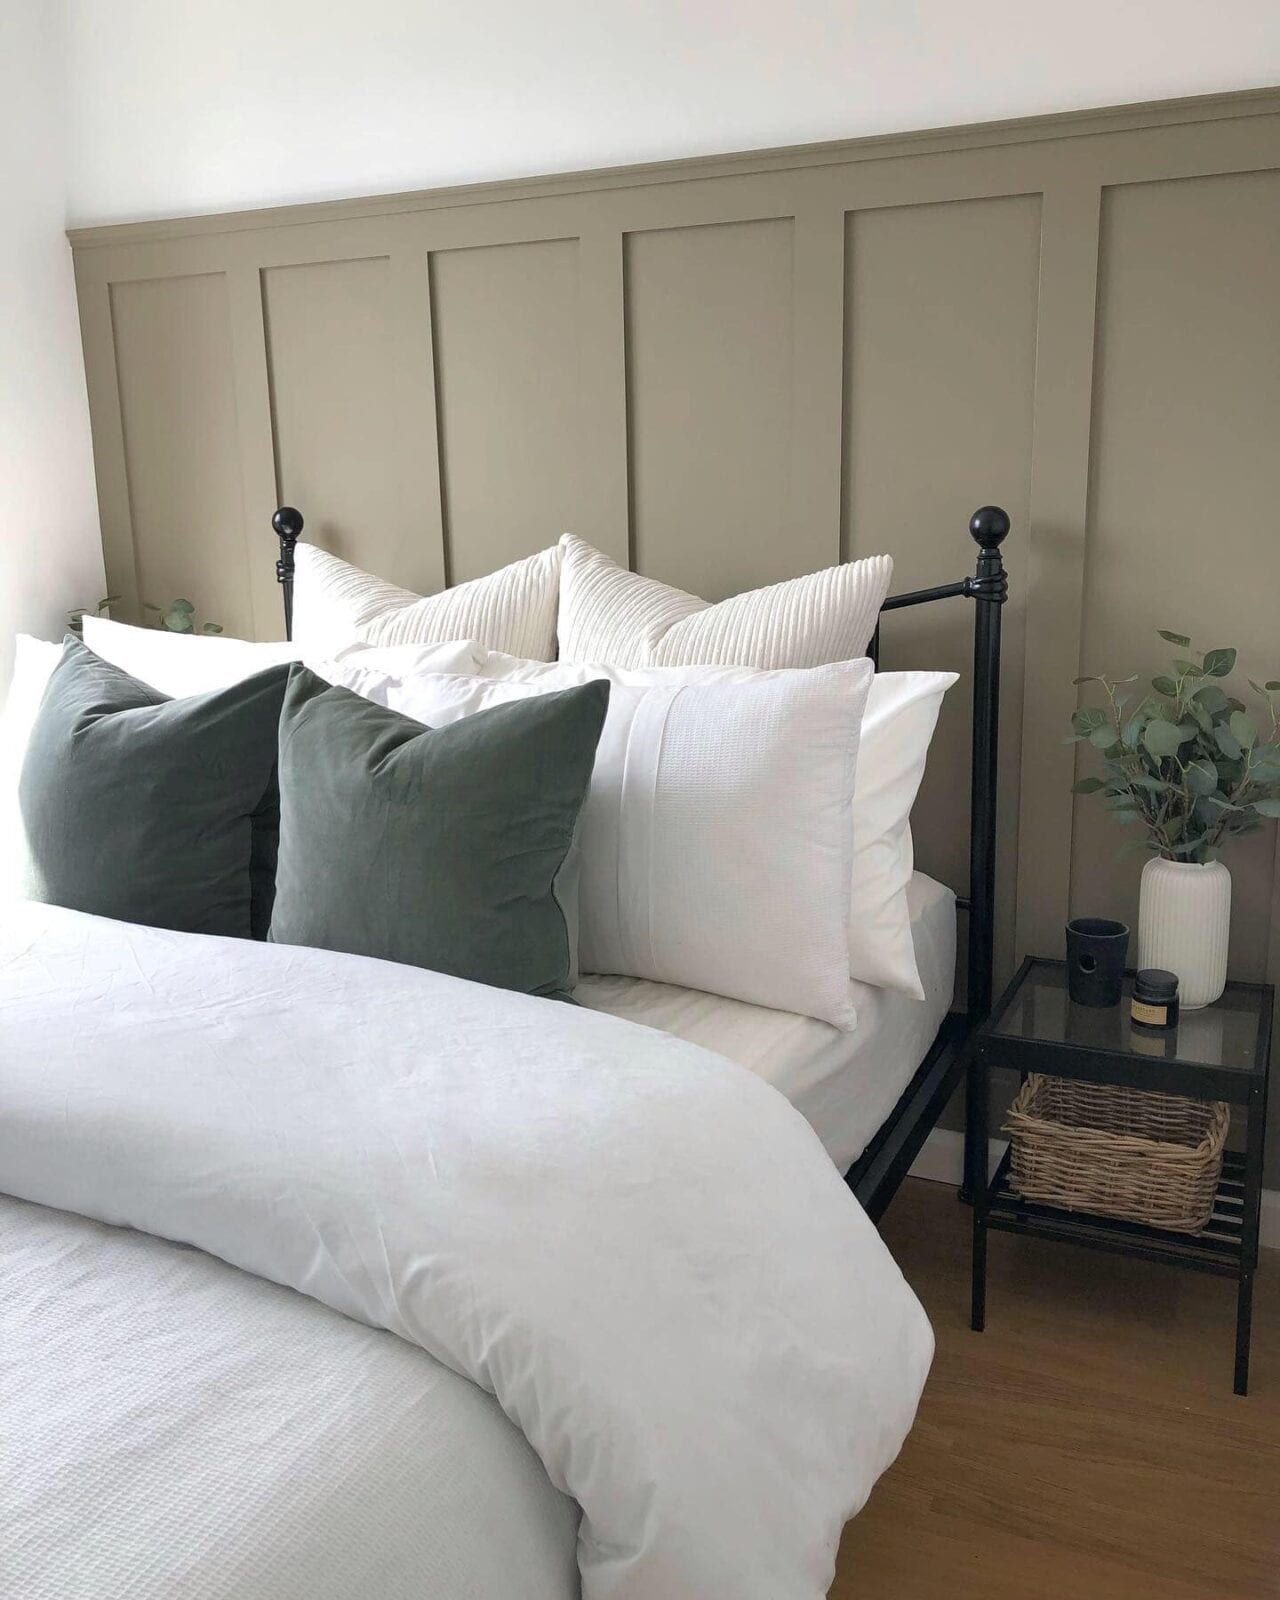
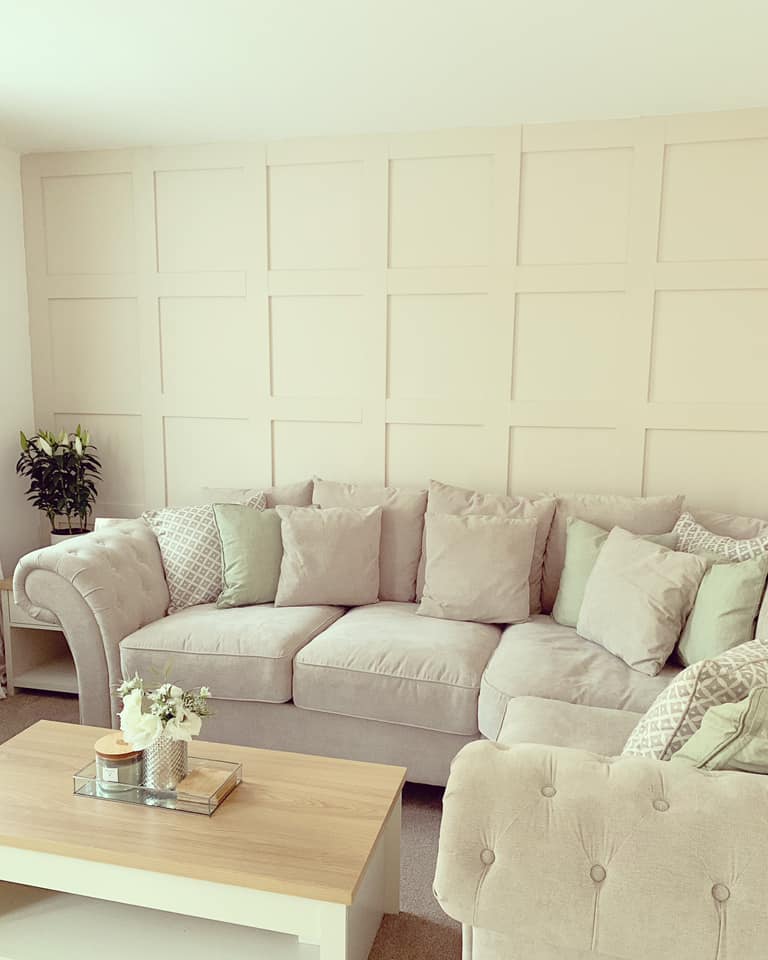
Well, it seems that pretty much everyone has been trying their hand at DIY wall panelling with MDF wood as their latest lockdown project in a bid to add texture to their tired rooms, and some of the transformations are nearly unrecognisable too.
Pinterest / Champions (UK) PLC
Acting as a fresh take on the feature wall phenomenon from the last decade, panelling can add warmth, depth and character to any space, no matter the size, and appears to be especially popular in the hallways, bedrooms, living rooms, and bathrooms of DIY fans.
ADVERTISEMENT
Styles of panelling include mouldings with grand period designs, tongue and groove, traditional shaker-style, Jacobean-style grid, or dado style.
And it’s actually fairly simple to achieve for yourself too, hence the popularity.
While it’s advised by interior design experts and stylists that you do a bit of research into what style of panelling is likely to suit your home best before you roll up your sleeves and get stuck into it, you shouldn’t be put off if you’ve never done it before.
Despite how tricky it may look to start with, even just a little know-how means you can make decorative wall panels easily and quickly, and achieve great results.
Fancy giving it a go then?
ADVERTISEMENT
Before you begin, the essentials you’ll need for this include – MDF wood panelling, a spirit level, No Nails Glue (or a similar brand), decorator’s caulk, a saw or cutter, a notebook and pen to jot down sizes, your choice of paint, sandpaper or an electric sander, a hammer, pins, and a tape measure.
Firstly, you’ll want to have a bit of fun planning your styles of panelling and seeking out inspiration online to get a feel for what will look best in your home, before you begin the important measuring process, which requires you to decide how many panels you want, and then use your tape measure to work out the full width and height of the wall you are deciding to panel.
Then it’s time to cut the panels, which you can either enlist the help of a professional for, or do yourself by using a saw and mitre box at a 90-degree angle, carefully cutting the panels that will be horizontally placed according to the measurements, repeating this process for all of the vertical panels and lightly sanding the ends until smooth.
You’ll want to spend some time sanding and smooth down the rest of your walls next, either with sandpaper or an electric sander if you have one to hand.
Now it’s the crucial process of applying the panels to your wall, where it’s advised to start by adding the frame – first with the base panels, followed by the top – then placing your panel onto the marked wall and using a laser level to ensure the panel is straight, before applying a strong adhesive to the back, sticking it to the wall, and being sure to press down firmly.
ADVERTISEMENT
It’s best to add the vertical panels first, followed by the horizontal panels.
Then finally, once you have applied the panels to your walls, you’ll need to go over them with decorator’s caulk to patch up any unsightly gaps, cracks or holes and wait for it to fully dry, before sanding down to complete the look and finishing off with your choice of paint.
And you’re done.
If you need a little more guidance, just remember that social media is your best friend for this, and you can also find further information about achieving your own DIY panelling here.
Trending
Blossoms to play special ‘intimate’ 10th anniversary gig at The Deaf Institute, Manchester
Danny Jones
Local indie and alternative lads Blossoms have announced a special one-off anniversary show at none other than The Deaf Institute right here in Manchester.
Coming to the iconic small-cap venue this summer, the Stockport band will be marking the 10th birthday of their self-titled debut album by playing one of the smallest gig spaces in the centre, but one that was a massive milestone for them back in the day.
Now a full decade on from the breakout LP, released on 5 August 2026, Blossoms will be rolling back the years by playing the biggest hits from the record, along with a selection from the many other bangers that they’ve gone on to release since.
This is going to be one very special night for the SK natives.
We’re playing an intimate gig at The Deaf Institute on Weds 5th August to celebrate 10 years of our debut album! We’re going to record the show & release it as a special edition double CD of our new album. Pre-order it now for exclusive pre-sale access. https://t.co/ztAkh95RWspic.twitter.com/kuZNnJJBok
Blossoms have never shied away from championing their Stopfordian roots, but neither have they forgotten the city that helped establish them as one of the biggest bands in Britain.
For instance, this upcoming Deaf Institute show – which promises to be a much more intimate show than they’re used to doing these days – comes not even two years on from the mini Manc residency, when they played five nights here in Manchester over the course of a single week.
As we come up to the sixth studio project, Songs From The Wedding Cake, and already have two singles from the next release, we have no shame in admitting we still listen to those first tracks as much as ever.
With that in mind, it’ll be a surreal full circle for everyone, we’re sure, when Tom, Chaz, Myles, Josh and Joe take the stage in that hallowed hometown room with a capacity of just 250 next month; they’re even playing it EXACTLY 10 years on the precise date that maiden outing dropped: 5 August 2026.
Combine this with them pulling stunts like playing people’s weddings and popping up with a surprise set from inside a van outside 42s nightclub on Deansgate, and it’s hard to think of an artist nailing it as well as Blossoms are right now.
Fans can enjoy exclusive early access by pre-ordering the new Blossoms album on their website, and those who have already done so qualify for presale automatically – just keep an eye out for the code in your email inbox.
This limited window will open from 9:30am this Thursday, 30 July, with general admission tickets for their return to Deaf Institute going live at the same time the following Friday (31 July).
Oh, and in case you somehow missed it, they’re also set to play their biggest ever arena shows across the UK later this year, including a huge gig at Co-op Live. Find out all the info down below.
Luke Littler is challenging amateurs to beat him at darts as part of a live Netflix event
Danny Jones
In an unprecedented new sports event in the world of streaming, North West sports star Luke Little is offering people the chance to try and win a game of darts against him live on Netflix.
Best of all, he and the entertainment platform have put up a huge grand prize for anyone who can beat the Warrington wonder.
So, for any of you who fancy yourselves as Phil ‘The Power’ Taylor reincarnated when stepping up to the oche down at the local, or if you’re simply bold enough to throw your name in the hat, you’ll want to pay attention for this one…
Announcing the special one-off sporting event on Netflix later this year, Luke Littler has issued the call-out to see if anyone can best him in a game of 501 in front of millions watching at home.
Quite literally the opportunity of a lifetime for fans of the arrows, this exclusive livestream is like nothing that the media giants have done before.
Having dipped their toes into the likes of live boxing fights over the past few years, they’ve definitely got a few live events under their belt, but this exciting and crucially interactive series of matches feels like something genuinely new for Netflix.
Most notably of all, using the name of the popular darts game played not only live on telly at competitions throughout the year but also at countless pubs across the country to set the prize fee, a prospective winner could potentially win £501k this autumn.
Imagine: half a million pounds for one (admittedly very tough) game of darts.
The only major caveat aside from, you know, him being an absolute phenom and already a serial winner is he also happens to be in the form of his life – his words and virtually everyone else’s.
"This is the best version of myself… I'm playing SO WELL!"
Luke Littler listens to some of the records he's broken in his ridiculous World Matchplay campaign 🤯 pic.twitter.com/EVQSrHxSHf
Having smashed Gerwyn Price to defend his World Matchplay Darts title on Sunday evening, cruising to an 18-9 victory with so many 100+ visits and finishes that he broke the tournament’s record average, which has stood since 2010, anyone who does come up against him is currently praying for a miracle.
Price himself told Sky Sports that the youngster’s performance looked ‘effortless’, quipping, “I hope there’s nobody else like him coming through!”
Still only 19, the local lad is the toughest of tasks for even the best on the pro circuit, but if you still somehow fancy your chances, heats will be taking place in Manchester and London, where the top 20 players will get their shot at the man himself on Friday, 30 October.
You can find out all the important information and sign up right HERE.
For now, why not see just how good Littler is playing at the minute and watch back his highlights from a record-breaking final this weekend?
Not that he’s ever truly cooled off, but he really is on fire at the minute.